Wednesday, October 7, 2015

Using CodeMirror in your APEX Application

I just had a look at a blog post by Connor McDonald where he's asking for opinions how code should be presented on the AskTom website.
In my opinion I would love to have the line numbers removed from the actually code and instead let the get generated by a code highlighter.
With APEX 5 the development team uses CodeMirror for the App Builder, meaning the needed library is already included with every installation of APEX 5.

Getting your code highlighted

First of all I'm assuming you put your code into some sort of a tag, otherwise it wouldn't possible to distinguish code from other text. I did a quick check on the AskTom website and they seem to use the <pre> tag, so I'll use the same to demonstrate. Let's prepare a single page for displaying nice highlighted code.

Update page JavaScript and CSS attributes

Add following to JavaScript File URLs:
#IMAGE_PREFIX#libraries/codemirror/4.4/codemirror-custom.min.js
#IMAGE_PREFIX#libraries/codemirror/4.4/mode/sql/sql.min.js

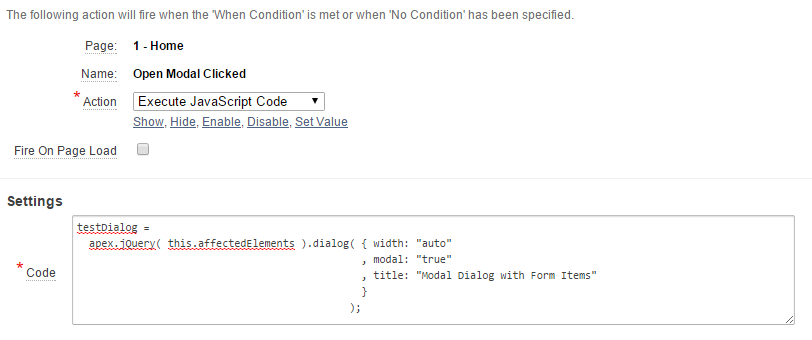
Add this to the "Execute when Page Loads" sections:
apex.jQuery(".code").each(function() 
{ 
  var myThis = apex.jQuery(this);
  var myCode = myThis.html();
  var myMIME = myThis.attr("data-code-mode");
  myThis.empty();
  CodeMirror(
    this,
    {
      value: myCode,
      mode: myMIME,
      lineNumbers: !myThis.is('.nolinenumbers'),
      readOnly: true
    }  
  );      
});
This code searches all elements having class "code" and uses the contained html as the code to highlight. The language is derived from an attribute called "data-code-mode", if you want to use something else than what is included in the sql.min.js file you need to include additional files from  the CodeMirror mode directory.

In CSS File URLs add the CodeMirror gloabl css file:
#IMAGE_PREFIX#libraries/codemirror/4.4/codemirror-custom.min.css

Finally specify this for Inline CSS:
.CodeMirror {
    height: auto!important;   
}

Adding code blocks

Now just add a new region to the page, I have used static content for now as this is just an example.
The content of the region is the following:
This is some text first...
Now show code:
<pre class="code" data-code-mode="text/x-plsql">DECLARE
  l_data VARCHAR2(32767);
BEGIN
  NULL;
END;</pre>
More text below code block.
now using a div for code:
<div class="code" data-code-mode="text/x-plsql">
SELECT user
  FROM dual;</div>
Nice, isn't it?

Finally some code without line numbers 
<span class="code nolinenumbers" data-code-mode="text/x-plsql">SELECT * FROM emp;</span>
where we just select everything from the famous emp table.

And the rendered result looks like this:

This is all more or less a quick hack, but I hope you get the idea and can make some good use of it.

Tuesday, October 6, 2015

Using Wallet Authentication with SQLcl

Ever since SQLcl came out I was waiting for it to support wallet authentication.
Today the waiting is over and all you need to do is grab the new SQLcl release from the SQL Developer download page. (Hint: The download link is at the bottom of the page.)
Now that you have the latest release let's prepare your client machine to use credentials stored in a wallet.

Preparing the for wallet authentication

First of all you need an Oracle client installed as wallet authentication is not possible using the thin driver. Make sure to have your client home on 12.1.0.2.x otherwise SQLcl can't make use of it.

Then update your sqlnet.ora file by adding following lines:
WALLET_LOCATION =
   (SOURCE =
     (METHOD = FILE)
     (METHOD_DATA =
       (DIRECTORY = D:\ora_wallet)
     )
   )

SQLNET.WALLET_OVERRIDE = TRUE
Make sure to update the line where the directory is set to match the location where you want to store your wallet. The last line allows the wallet to override any existing OS authentication setting.

Now modify your tnsnames.ora and add another entry which points to the database you want to connect to later. Give it a recognizable name because you will need it again when saving the credentials in the wallet. I will use "wallet_test" as the tnsname in this post.
If you use different users on a single database you have to add one tns entry for each user. The reason is that there is a one to one relationship between a credential and a tns entry.

Next step is to create the directory where your wallet should be stored.
Afterwards create the wallet by using the orapki utility from the Oracle Client:
orapki wallet create -wallet "D:\ora_wallet" -pwd "test_1234" -auto_login_local
Now store the credentials in the wallet by using the mkstore tool with following syntax:
mkstore -wrl "D:\ora_wallet" -createCredential tnsname username password
You can also emit the password and then you'll be asked for it by the tool.
Enter the wallet password and wait for mkstore to exit.

Finally test your setup by using good old SQL*Plus:
sqlplus /@wallet_test

Using the wallet with SQLcl

SQLcl is a Java application and therefore uses jdbc to connect to the database.
The latest release added support for custom jdbc connect strings and that is what we actually need.
Connecting with SQLcl using the above created credential looks like this:
sql /@jdbc:oracle:oci8:@wallet_test
The syntax might look a bit strange compared to the SQL*Plus one but you need to put the "/@" before the custom jdbc connection string and still prefix the tnsname with an "@".

Enjoy connecting to your database without specifying a password on the command line.
The main use case will most probably be for batch scripts, but I think switching to wallet authentication as much as possible also helps when you have to work in public places.

Thanks to the SQLcl team for adding another great feature.

P.S.: @Kris, the next blog post is on you. ;-)

Tuesday, September 1, 2015

IR Column Headings with HTML in APEX 5

Old and new world

This might be something for all of you that have used HTML in interactive report column headings .
It was a convenient way to break up long headings if you already knew the content was much smaller.
To give you an example think of a date field with format mask 'DD.MM.YYYY' and a column heading of 'Final Auditor Approval Date'.
Now compare the size of the content to the heading size, which is 10 characters to 27 characters, so you might be wasting a lot of real estate for this column.
One approach is to specify the column width and enable word wrap using css, but what if you wanted the column heading to wrap at a specific position?
Well you can play around with your css rule until you get the desired result or you simply embed an html line break into your column heading and I typically used the latter.
The minute you upgrade to APEX 5 there's a small caveat with this solution.
Let me show you an example of what I'm talking about:

Do you see the html characters in the column list when you click on the magnifying glass?
In APEX versions before 5 the tag was replaced by a blank, nowadays it's escaped.
APEX 5 has gotten way better responsive features than before, but what if even that isn't sufficient?

There's an app plugin for that

Having the immediate need to find a solution I decided to create a plugin to solve this issue.
While thinking of options one that quickly came up was using the "Single Row View Label" as I'm not using the "Single Row View" in any of my applications.
Below you see an example I used during testing:
I removed the line break from the "Heading" and then changed the "Single Row View Label" to include it. So the data is stored in the APEX Metadata and I should now be able to use it.

The plugin itself is a dynamic action plugin and puts a small JavaScript function into the page.
The function retrieves a JSON object with column ids and column headings and then iterates over the object replacing the heading. Below you find sample code for the function:
function de_itt_apexir_hdr_break()
{ apex.server.plugin
  (
    '#AJAX_IDENT#' // This gets replaced by apex_plugin.get_ajax_identifier
  , { x01: this.affectedElements[0].id } // IR id
  , { success: function( pData ) 
               { apex.jQuery.each
                 ( pData, function(index, value)
                   { apex.jQuery("#" + index + " > a").html(value); }
                 ); 
               }
    }
  );
};

The callback function runs following query to compose the JSON object:
SELECT 'C' || aapic.column_id column_id
     , aapic.form_label
  FROM apex_application_page_ir_col aapic
     , apex_application_page_regions aapr
 WHERE aapic.region_id = aapr.region_id
   AND aapr.application_id = apex_application.g_flow_id
   AND ( aapr.region_id = to_number( regexp_substr( apex_application.g_x01, '\d+') )
      OR aapr.static_id = apex_application.g_x01
       )
   AND aapic.report_label != aapic.form_label
;

So far my tests didn't show any negative impact except for the obvious extra round trip to the database. Below screenshot shows same IR as before but using the plugin.


Want to test the plugin?  Download it here and install like any other plugin.
Follow the included readme file to create a dynamic action based on the plugin.
I haven't run that many tests yet, but maybe you would like to help?
If you encounter any issues or have recommendations, either open an issue in the repository or write a comment here.

Hopefully the plugin helps you to overcome one of the small hick-ups when upgrading to APEX 5.

Thursday, August 13, 2015

Using conditional compilation for APEX dependent code

I'm currently working on a new release of my PPTX Creator Package.
While adding parts which would only compile if APEX is installed in the database I thought maybe it's a bad idea to introduce a hard dependency as a lot of the code doesn't need APEX installed.
So I needed to come up with a way to allow installation without APEX, but also enable additional functions when APEX is installed.
The options I checked where:
  1. Split into APEX-specific and generic package
  2. Offer two versions of the package
  3. Use conditional compilation
From the titel you might already know which option I chose, but let's briefly look at the implications of the options.

Option 1:
Splitting into two packages seemed like an immediate win as it feels natural for the use case. However when looking a bit further it could lead to the need of exposing internal parts of the generic package.
Running on 12c you could use the ACCESSIBLE BY clause to mitigate, but not everyone is on 12c (yet). A good blog post on the ACCESSIBLE BY clause can be found here.

Option 2:
I immediately moved over that option, just imagine the maintenance effort:
It would be a like fixing two different packages with a lot of copy-and-paste code back and forth.
No I don't want that!

Option 3:
I decided to use conditional compilation for the APEX specific features. For those of you who don't know conditional compilation yet, have a look at this Oracle Magazine Article by Steven Feuerstein from 2006 and also check out the links in that article.
In short conditional compilation allows you to exclude or include parts of the package during compilation based on conditions specified. A typical use case for conditional compilation is having one package which conditionally compiles with different code based on the Oracle Release.

So I had decided to use conditional compilation, but then I realized that I hadn't thought of how to determine if APEX is installed. Unlike the version use case, for which the database provides the DBMS_DB_VERSION package, there is no such thing for verifying installed components.
So let's start with how to generally check if APEX is installed.
If you have DBA rights you can use following query:
SELECT comp_name, version, status
  FROM dba_registry
 WHERE comp_name = 'Oracle Application Express'
;

Without DBA rights it's a bit different, as there is no ALL_REGISTRY table in the dictionary. There is a USER_REGISTRY table but that doesn't help either.
However there is something called ALL_REGISTRY_BANNERS and we can use that one with any user. To check if APEX is installed simply run the following query:
SELECT banner
  FROM all_registry_banners
 WHERE banner LIKE 'Oracle Application Express%'
;

Now let's move on to finding a means to use the query result for controlling the conditional compilation. You can also use user-defined flags for controlling the compilation process, below show how to set a flag called apex_installed for your session.
ALTER SESSION SET plsql_ccflags = 'apex_installed:1';
You can reference this flag in conditional compilation blocks within your code.
To recap, we now have a means to check whether APEX is installed and we are able to set a flag to be used by the conditional compilation.
Putting everything together I ended up with an install script similar to the code code.
SET define '^'
define HASAPX = '0'
column apx new_val HASAPX

SELECT '1' AS apx
  FROM all_registry_banners
 WHERE banner LIKE 'Oracle Application Express'
   AND ROWNUM = 1
;

ALTER SESSION SET plsql_ccflags = 'apex_installed:^HASAPX';
@@install_package.sql

Within the package you surround the code blocks with something like
$IF $$apex_installed = 1 $THEN
-- Put APEX specific code here
$END
To catch the case when the flag isn't set before compilation include an error clause like below
  $IF $$apex_installed IS NULL $THEN
    $ERROR 'Set CCFLAG apex_installed to either 0 or 1.' $END
  $END

That's all for now folks, but stay tuned for the next release of my PPTX Creator package with much enhanced functionality.

Monday, February 23, 2015

APEX IR XLSX Downloader V1.3.0

After a long time I have finally published Release 1.3 of my APEX IR XLSX Downloader.
And because I kept you waiting so long there's one goody included.

Added Features

  • The Interactive Report region ID is now automatically derived if not specified or set NULL.
  • Function get_version which emits the package release you are running.

Bugs Fixed

  • Column header wasn't filled if user didn't give a custom name for a function column in "Group By" view.
    Now the package puts similar names to what the APEX engine generates.

New Demo Application

There is also a new demo application available for download.
You can download it here and install into your own APEX workspace.

As always the source code can be found in the GitHub Repository.
ZIP files for all my GitHub projects can now be found on my GitHub Page.

Enjoy ;-)

Saturday, January 31, 2015

Oracle Application Express EA3 is now available

APEX EA3 is here

Just read this one on Twitter:
So head over to apexea.oracle.com, request your workspace and start testing all the new features.

I received my access within minutes, so be prepared to immediately have a reason for spending time on your computer. ;-)
First thing I did was checking out the "Universal Theme Sample Application".
Shakeeb did a very good job of explaining the Universal Theme Components.

Interestingly the beta documentation for APEX 5.0 was already made available.
A very nice move in my opinion. Click on the link above or use http://docs.oracle.com/cd/E59726_01/index.htm.

So long for now folks and enjoy your first weekend with APEX 5.0 EA3. ;-)

Friday, January 30, 2015

APEX jQuery Modal Dialog Oddities

Lately I have been working on creating a new version of my demo application for the APEX IR XLSX Downloader.
The package provides a set of configuration parameters which I thought would be nice to present to the user instead of being solely defined by the developer.
During that I encountered some oddities when using a jQuery Modal Dialog to render a region as a modal dialog.

Note: I'll show you the steps to reproduce and fix in a newly created application. But you can also just create a new page in an existing application.

Steps to reproduce and fix:
  1. Navigate to the page where you want to put the modal region containing form elements.
  2. Create a new region accepting all defaults
  3. Create a button in that region and set Action to "Defined by Dynamic Action"
  4. Create a new region accepting defaults except for "Display Attributes"
    Select "jQuery Modal Region Template" as "Region Template"
  5. Create at least one item which should save session state on the modal region.
    I used a text item and made it submit on enter for this example.
  6. Create the dynamic action reacting to button click.


  7. Run a simple test
    1. Run the page
    2. Click open Dialog button
    3. Enter something in the text field and hit enter.
    4. Now verify session state
    5. So we submitted the page with a new value in the item, but it doesn't look like it was pushed into session state.
  8. Finding the reason for session state not being updated.
    1. Analyze DOM before dialog open.
    2. Analyze DOM after dialog open.
  9. This tells us that the region gets moved outside of the <form> container, making the item invisible to APEX.
    Therefore no update in session state.
  10. Steps to fix DOM
    1. Create Dynamic Action which fires "Before Page Submit"
    2. Set action to "Execute Javascript Code":
      apex.jQuery( this.affectedElements ).dialog( "destroy" ).appendTo( 'form#wwvFlowForm' );
      
    3. Set "Affected Elements" identical to previous Dynamic Action.
  11. Test again with same steps as noted in 7.
    This should now work.


  12. Enjoy nicely working modal dialogs.